Connect your first form.
Receive one real test message from the form on your existing website. Use your AI tool for the integration; email notifications and Turnstile protection are optional.
Have a website you can edit and an account email you can open. You must verify the account email; a separate notification recipient is optional.
Create your account and verify your email
Select Start free and enter your name, your email address, and a password. We send a verification email; open it, follow the link, and select Verify email on the page that opens.
Example: sign up with the address where you want to receive notifications, such as hello@example.com. After verifying, select Open workspace to return to your workspace and its setup checklist. Next: add your website.
Add your website
Open Sites in the sidebar and fill in Add a site: a Site name you will recognize and the Allowed origin where your form runs. Select Create site.
An allowed origin is the website address with scheme, hostname, and any non-default port, but no page path. Example: https://www.example.com. A subdomain counts as a different origin, and wildcards are not supported.
You will see the site listed with Protection off. Spam protection is optional — you can enable forms on an unprotected site — and the optional steps below show how to turn it on after the first integration. You can add more origins later in the site’s Settings.
How origin checks work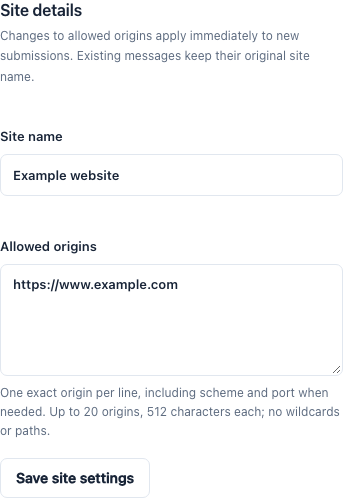
Create your form and enable it
Open Forms and fill in Create a form: a form name and the site you just added. Leave Send new-message email notifications unchecked to save messages in the inbox only, or check it and select a verified, unblocked recipient. Select Create and enable to start accepting submissions. Saving a draft is optional: select Save draft, then enable it from the Forms list when you are ready; you do not need to open its details.
You will see the status change to Active. The configuration check shows Turnstile as Not configured on an unprotected site — that is fine; submissions are saved without the verification challenge. A draft stays paused until you enable it, so submissions are rejected until then.
Connect the form with your AI tool
Open the new form from Forms, then find Connect your website. The default way is Use AI to connect: copy the prompt and hand it to your AI coding tool, which edits the existing form on your site, keeps its design, and follows the current integration rules. If you prefer editing code yourself, choose HTML, React, or Astro and copy the matching example; all options use the same endpoint, and a public Site Key is included only when protection is enabled.
Do not assemble the address by hand — the form page supplies the values. Your Turnstile secret never appears in browser code.
Follow the AI integration guide Prefer code? View the manual examples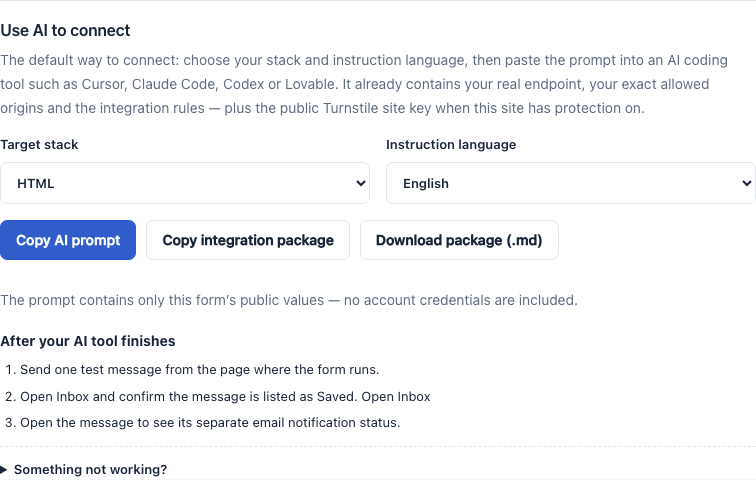
Review the AI changes, then send a test message
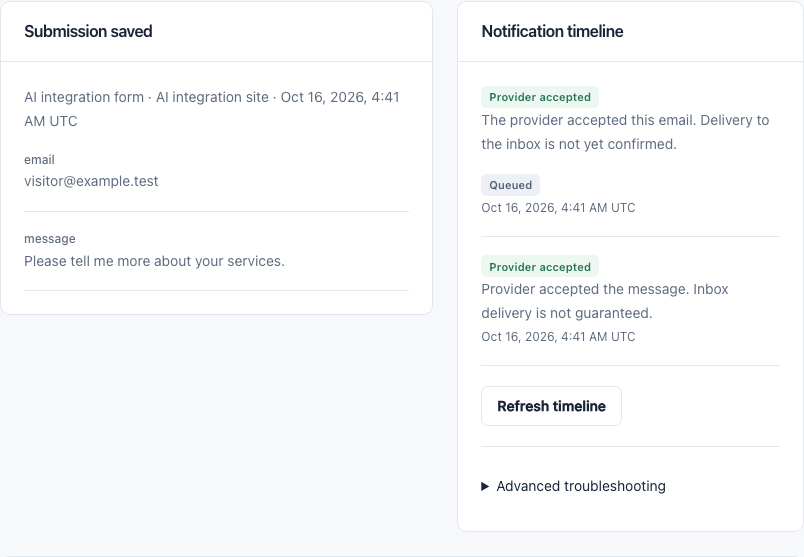
After your AI tool finishes, review its changes and publish the updated site. If you chose the code examples instead, install that code on the page where your form should appear and publish it. Submit one test message from your browser, then open Inbox.
The message should be listed as Saved. If email notifications are enabled, open it to check the separate notification status and the recipient’s mailbox, including spam. With notifications off, confirming the saved message is enough. An accepted test counts as one submission for this month.
Add notifications and protection when you need them
Neither option is required to save your first message to the inbox. Verify a recipient when you want email alerts; configure Turnstile when you want bot protection.
Add a notification email (optional)
Email notifications are optional. To receive an email for every message, open Recipients, add the address that should be notified, open the verification email we send, follow its link, and select Verify email on the page that opens. If you skip this step, messages are still saved in your inbox — only the email is left out, and you can turn notifications on later in Form settings.
You will see the address marked Verified. Unverified or blocked addresses cannot be selected by a form. Then select that address in the form’s settings when you enable email notifications.
Turn on spam protection (optional)
Without protection your form already accepts submissions; adding Cloudflare Turnstile checks each submission before saving it; Managed mode usually runs without requiring interaction. To turn it on, open the Cloudflare dashboard → Turnstile in a new tab and select Add widget. Give it a name, add the hostname where your form runs (for example www.example.com), keep Managed mode, and select Create. Copy its Site Key and Secret Key.
Back in FormPostbox, open Sites → your site → Settings → Spam protection. Paste the Turnstile site key and the Turnstile secret key, then select Save protection.
You will see Protection settings saved. and the site switches to Protection on. Both keys must come from the same widget.
Full Turnstile walkthroughStill need help? Contact support@formpostbox.com. Include the guide topic and redacted error details, without keys or visitor messages.
Browse all topics ↑